This is the multi-page printable view of this section. .
Share
- 1: Multilingual Hugo Blog
- 2: Simulating Wait Times at the Gym
- 3: Migrating from Disqus to Giscus for the Comment System
- 4: Implementing a Simple Dark Mode with CSS Filter
- 5: Connecting to Physical Screen with VNC
- 6: Constructing a RegEx that matches all emojis
- 7: Monitor the number of goroutines
- 8: Code blocks within Markdown tables
- 9: Integrating Disqus with Hugo
Share some tips and tricks.
1 - Multilingual Hugo Blog
I recently came across a classmate’s sharing, mentioning that after making their blog multilingual, they saw a significant increase in traffic. So, I decided to give it a try as well. With the help of OpenAI, translating articles is not a difficult task. However, adding multilingual support to an existing Hugo site is still not a walk in the park. Although Hugo itself has the basic features for multilingual support (Documentation: Hugo Multilingual), if the chosen theme does not support it, modifications to the theme are necessary.
For my blog, I have chosen the “translation by filename” approach, which seems to be the least intrusive solution based on the documentation. In simple terms, if your blog’s Markdown file is located at /content/blog.md, you can add an blog.en.md file at the same level to provide the English translation. After completion, you can access the translated version by appending /en/ to the domain name. (The default language, in my case, is “Simplified Chinese,” so no language suffix is needed for the path.) However, it is unacceptable to expect users to manually add the language route, so a language selector needs to be added to the page. For now, I have added it to the top of the page. And voila, your multilingual blog is ready to go live!
There are still some known issues that I will address when I have the time:
- Various navigations (e.g., the back button in the top left corner) will return to the root directory of the site (i.e., the Simplified Chinese homepage); the proper way is to return to the corresponding homepage of the current language.
- The RSS feed link is problematic; the default link provided is still for the primary language, while the English link is under the
/en/path. Perhaps an integrated RSS feed should be considered?
Most of the core multilingual code can be seen in this commit: ca7a83d
For more reference links:
2 - Simulating Wait Times at the Gym
In mid-July, I visited the hospital and started exercising regularly upon the doctor’s advice. After considering my work schedule and my physical condition, I decided to go to the gym for a workout during lunchtime. Currently, my daily exercise routine consists of spending about 20 minutes on the elliptical machine at the gym (while watching an episode of a TV show), burning approximately 320 calories. However, even though there are plenty of elliptical machines in the gym, a situation occasionally arises where there are no available machines and I have to wait for someone to finish. Not knowing how long the wait will be can be slightly anxiety-inducing. So, I started thinking about whether there is a way to quantify the wait time, such as simulating and calculating the probability distribution function. And that’s how this article came about.
Code (mostly written using GPT3.5, with some manual adjustments): link to code
Assumption: There are 10 elliptical machines, and the exercise time of each user on a machine, denoted as t_n, follows a normal distribution with a mean of μ and a standard deviation of σ. When I arrive at the gym, all 10 machines are already occupied, and the remaining exercise time for each user is uniformly distributed between 0 and t_n. The wait time is defined as the minimum of the remaining exercise times for all users.
Considering that the parameters μ and σ cannot be accurately estimated, we consider 9 different scenarios by varying μ as 5/10/15 and σ as 20/25/30. For each scenario, we run 10,000 simulations and calculate the p50/p75/p90/p95 of the wait time. The results are summarized in the following table:
| μ | σ | mean | p50 | p75 | p90 | p95 |
|---|---|---|---|---|---|---|
| 20 | 5 | 1.698 | 1.252 | 2.406 | 3.817 | 4.811 |
| 20 | 10 | 1.258 | 0.858 | 1.772 | 2.944 | 3.813 |
| 20 | 15 | 1.151 | 0.737 | 1.604 | 2.761 | 3.641 |
| 25 | 5 | 2.198 | 1.632 | 3.123 | 4.978 | 6.229 |
| 25 | 10 | 1.769 | 1.258 | 2.494 | 4.077 | 5.213 |
| 25 | 15 | 1.477 | 0.967 | 2.069 | 3.508 | 4.634 |
| 30 | 5 | 2.671 | 1.977 | 3.813 | 6.059 | 7.515 |
| 30 | 10 | 2.284 | 1.669 | 3.219 | 5.186 | 6.632 |
| 30 | 15 | 1.965 | 1.364 | 2.720 | 4.624 | 6.019 |
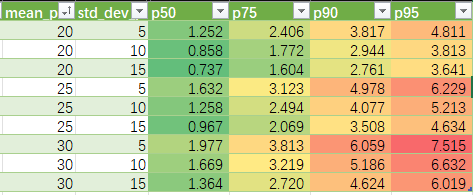
Conclusion: Taking all scenarios into account, there is a 50% probability of waiting for about 2 minutes to secure a spot, and in the worst-case scenario, there is a 90% probability of waiting for up to 6 minutes to secure a spot.
3 - Migrating from Disqus to Giscus for the Comment System
I used to use Disqus for the comment system, but there were occasional issues with accessing it from within China, and new users had to register again. Considering that most of the readers of this site are likely GitHub users, migrating to Giscus (a comment system based on GitHub Discussions) seems more suitable. Switching the comment system itself is not difficult, you can refer to this tutorial to modify the Hugo templates and configurations. Migrating the data is not troublesome either, as there weren’t many comments to begin with, so there are only two comments to manually migrate, which shouldn’t take much time (although I also tried an automated solution, but it seems to have some issues and the migrated comments don’t show up…). The slightly annoying part is actually the switching between light/dark mode in Giscus.
Because this blog has its own toggle button (see previous post), when users visit, they may retrieve the color mode preference from localstorage. However, currently, when Giscus is loaded, Hugo writes the color preference parameters into the HTML source code during site generation. Therefore, when the user clicks the button to switch, the color preference in Giscus needs to be switched as well. Referring to this issue in the official documentation, this feature is not difficult to implement. However, there is still a problem because after Giscus is loaded, if the user clicks the button to switch color mode preference, Giscus will use the color preference based on my Hugo configuration file, rather than what is stored in the user’s localstorage. As a result, the user may manually choose the light mode, but if the browser settings have prefer-color-scheme: dark, Giscus will display a black background with white text. There wasn’t a good solution to this problem in the previous issue discussions, although I saw someone using setTimeout to continuously loop, but that doesn’t seem very elegant. After reading the official documentation, I found that Giscus actually sends an event to the parent window after it finishes loading, so as long as we listen for this event, we can set the color preference for Giscus after it has loaded. You can refer to this commit for the related implementation.
Perhaps there will be more comments after the switch? Hopefully.
4 - Implementing a Simple Dark Mode with CSS Filter
The Manis theme used on this blog does not provide native support for dark mode, so I decided to add it myself. Initially, I thought about customizing the CSS with media queries, but it seemed like a bigger change. I did a quick search and found that someone had already proposed the idea of using CSS Filter to implement a simple dark mode, and there was even code that could be directly applied to a Hugo blog. Compared to media queries, using CSS Filter not only simplifies the implementation, but also allows users to switch between light and dark mode without adjusting the system/browser’s global settings.
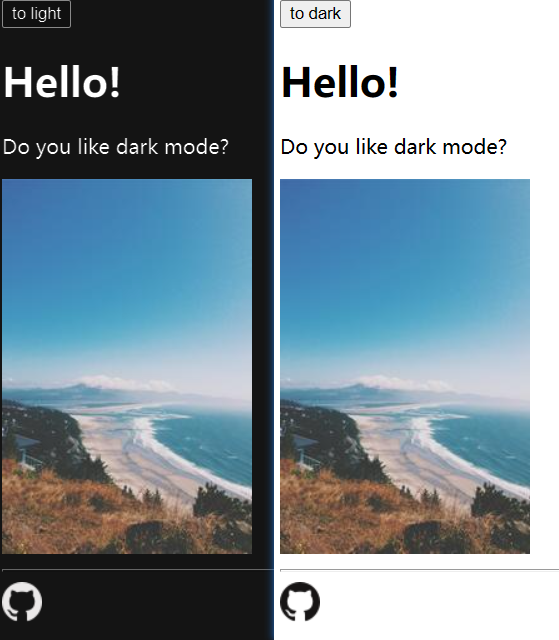
In the specific CSS implementation, I first used invert(1) to invert the colors of the entire webpage, but this also caused a reversal of color tones. Therefore, I used hue-rotate(180deg) to bring the tones back. However, while this operation is suitable for text, it affects the display of images, videos, and other elements, making them appear as if they were being X-rayed. So, I had to apply invert(1) hue-rotate(180deg) again to these elements that needed to be excluded from the dark mode, in order to revert them back to normal.
To allow users to switch between light and dark mode, an additional toggle icon needs to be introduced. When clicked, it will insert/remove the CSS tag for dark mode and save the user’s preference to localStorage. If the user has not explicitly set a preference, the system/browser’s global dark mode setting should be followed. Therefore, I used window.matchMedia to detect it.
The complete modifications can be seen in my Pull Request for implementing dark mode in this theme. A simple example can be found in this Gist. The final result is as follows:
Update on 12/27: The PR has been accepted and merged.
5 - Connecting to Physical Screen with VNC
When searching for “Linux remote desktop,” most tutorials suggest using the combination of “xrdp + xfce4.” In general, this combination works well, but it may not be as effective for certain special requirements. In my use case, there are times when I have a long-running task on a Linux workstation in the lab, and I need to check if the process is running smoothly when I return to my dormitory. If it were a regular CLI program, using terminal multiplexers like “screen” or “tmux” would be more than sufficient. However, I am using a GUI program. So, I searched for a solution and found that it is possible to connect to an ongoing X session using VNC, similar to tools like TeamViewer. Here are the specific steps:
- Install the TigerVNC server.
- Run “vncpasswd” to create a VNC password.
- Start the TigerVNC service.
- Use “x0vncserver” to open a VNC session connected to Display 0.
- Connect using a VNC client on another device.
In my own experience on Windows, it seems that RealVNC Viewer provides a better user experience compared to TigerVNC Viewer.
Another issue that may affect the user experience is scaling and screen resolution. The lab workstation has a 4K screen with 200% scaling, and when connecting from a 1080p laptop, the text may appear too small. TigerVNC seems to have an auto-scaling feature, but it doesn’t seem to work when connecting the VNC session to a physical screen. My workaround is to first connect and then manually adjust the resolution settings on the remote system (usually setting it to 2560x1440 is sufficient), then restart x0vncserver and reconnect. Although it’s a bit cumbersome, at least it solves the problem of usability.
6 - Constructing a RegEx that matches all emojis
While researching a CSS custom emoji font issue, I came across a RegEx that can match all emojis (up to the 2018 version) and it also provides corresponding test examples. You can find it here: Regex to match all emoji - Regex Tester/Debugger
After reading it, I was skeptical because the RegEx seemed too simple. So, I manually converted it to check the corresponding Unicode codepoint range, and I found that there is indeed a problem. The matching range of this RegEx is too broad, excluding the Copyright and Registered symbols (u+00a9, u+00ae), the remaining ranges are [u+2000, u+3300] and [u+1f000, u+1fbff]. The latter range seems reasonable, as it corresponds to the newly added emoji codepoints according to the Unicode plane mapping on Wikipedia. However, the former range is too extensive, even including Japanese Hiragana and Katakana characters. (Although it does cover almost all emoji codepoints, it misses some corner cases like selectors.)
So, how can we create a RegEx that accurately matches emojis? The idea is simple. First, we need to obtain the Full Emoji List from the Unicode official website, parse all the codepoints that belong to emojis, sort them, and finally merge adjacent codepoints into ranges. However, this is easier said than done. From the perspective of RegEx, characters are in UTF-16 (if using the form \uabcd), so codepoints higher than u+ffff need to be represented using surrogate pairs.
The final result is as follows: (Test link: regex101)
The ultimate question: Should you really use regex to handle emojis?
Postscript: After reinventing the wheel, I discovered that someone has already done this work in the emoji-test-regex-pattern repository. Moreover, compared to my single character matching approach, the regex in this repo can match sequences of characters that represent emojis (such as the Chinese flag = flag + China), which is more in line with the specification.
7 - Monitor the number of goroutines
Continuing to complete the previous debug process of writing Raft. After solving the Timer issue, it was discovered that even with repeated testing (using --count 10), the CPU usage continued to increase, although the rate of increase was reduced, it was still quite severe after multiple iterations. There was a preliminary suspicion that when transitioning roles, there might be a mishandling of goroutines leading to goroutine leaks. So, I searched on Stack Overflow and made some modifications to a code snippet that could print the current number of goroutines in the Go Runtime at regular intervals. Finally, it was indeed found that the number of goroutines kept increasing as the tests progressed. After fixing the leak issue (by adding various conditional checks), each time the test restarted, the number of goroutines would decrease to a level similar to the initial state, and the resource consumption during multiple tests also returned to normal.
8 - Code blocks within Markdown tables
Markdown provides support for tables, but only basic text formatting (such as bold, italics, inline code, etc.) is supported within table cells. More complex text formatting, such as code blocks and horizontal lines, is not supported. If you need to add support for complex formatting within tables and you are using Github Flavored Markdown, one approach is to use HTML to define the table structure and then include inline Markdown text within it. Here is an example:
Please note the following:
- The
<td>and</td>tags for the corresponding table cells should be placed at the beginning of a new line (without any indentation). - There should be a blank line between the Markdown text inside the table cell and the
<td>and</td>tags.
Example:
| Column 1 | Column 2 |
| Code Block | |
| Horizontal Line | Markdown Some Text |
Code: Note that the code block should end with 3 tildes (I’m using two here because three would cause rendering errors and prematurely end the code block).
Reference link:
9 - Integrating Disqus with Hugo
Hugo has built-in support for Disqus. In theory, you only need to set the disqusShortname attribute at the top level of your site’s config.toml file. However, there are some pitfalls when actually using it. Here are the specific steps.
- Register your own account on the Disqus website.
- After logging in to the Disqus website, go to Settings in the upper right corner, then select Moderation on the left side. Here, create a new site, and the site name (
{site_name}.disqus.com) should be used as the value fordisqusShortname. - Once the site is created, choose the Free Plan on the Billing page.
- Set the
disqusShortnamein theconfig.tomlfile of Hugo.
Other minor issues:
- No comments displayed locally: In the theme’s
disqus.htmlfile (located at{site_folder}\themes\{theme_name}\layouts\partials\disqus.html), the comment box will not load when the condition (indow.location.hostname == "localhost") is met. If you need to debug, you can add a comment to this condition, and it will display normally locally.